Quick Start #
Five steps from a box on the table to a glucose number on the screen. You need the device, a USB-C cable, a 2.4 GHz WiFi network, and the login for whichever CGM service you already use.
Flash the firmware
~5 minPlug the device into your computer with a USB-C data cable and use the browser flasher on the Build page. If you bought an assembled unit, it is already flashed — skip to step 2.
Join your WiFi
~2 minOn the device: gear icon → WiFi Setup. Networks scan automatically. Tap yours, type the password on the on-screen keyboard, and connect. See WiFi for detail.
Pick your CGM and sign in
~2 mingear icon → CGM Settings, then choose Dexcom Share, LibreLinkUp, or Nightscout and enter your credentials. Each one has a prerequisite on the phone side — see CGM Setup.
Set your location
~1 mingear icon → Time / Weather → Search Location. Type a city or postal code and confirm. Timezone, weather, and sunrise/sunset all follow from this.
Wait for the first reading
~90 secBack on the home screen the arc around the trend arrow fills, then your number appears. That’s it — the device now runs on its own. Next: set your alarms.
Total: about 10 minutes
Home Screen #
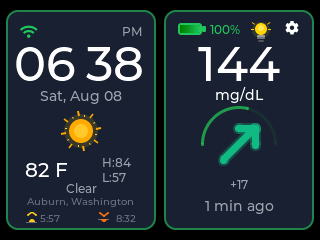
Two cards. Time and weather on the left, glucose on the right. This is the screen the device sits on all day, and it is designed to be read from across a room.
Reading the glucose card
- The big number is your most recent reading. Its colour tracks your own alarm thresholds — green in range, yellow approaching a warning, red past an alarm.
- Under it, the signed delta (for example +17) is the change since the previous reading, and time-ago tells you how fresh it is: “Just now”, “1 min ago”, and so on.
- The trend arrow glows and rotates smoothly to its new angle whenever the direction changes, so a change catches your eye without you staring at the screen.
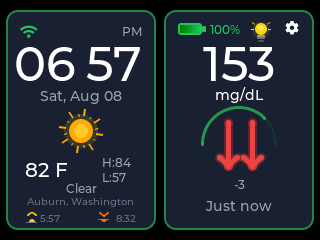
- A rapid rise or fall is drawn differently: two red arrows side by side that slide and pulse. That is a built-in visual alert — it fires on the trend alone, independent of your threshold alarms.
- The semicircle arc around the arrow is a countdown to the next data pull. It is full right after a reading lands, drains as the minutes pass, sits empty when the next one is due, and turns blue while the device is actually fetching.
- If a reading goes stale, the number greys out with a strikethrough and the age is shown, so an old value can never be mistaken for a current one.
- Along the top of the card: battery with percentage, the bulb icon for the display sheet, and the gear icon for settings.
The time & weather card
- Current time and the full date.
- Weather icon and condition, current temperature, and today’s high and low.
- Your location name.
- Sunrise and sunset times along the bottom.
Gestures
Swipe left on the glucose card
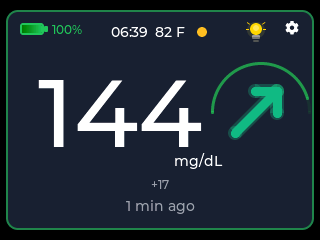
Expands to the big-number view. Best setting for a nightstand or a kitchen counter.
Swipe right
Collapses back to the two-card layout.
Tap the trend arrow
Opens the glucose chart.
Double-tap a dimmed screen
Wakes it. The first tap only wakes — it never presses whatever was underneath.
Glucose Chart #
Tap the trend arrow on the home screen and the history opens full-screen. This is where a number becomes a pattern.
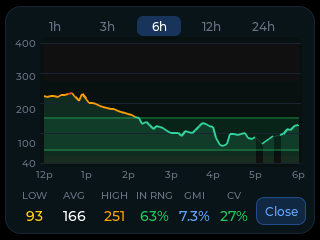
- Pick a window with the tabs across the top, or swipe left and right on the chart to move between them. 1h3h6h12h24h
- Tap any point on the line to inspect that exact reading — value and time.
- The line is coloured by value, and the shaded band shows your target range as defined by your alarm thresholds.
- The statistics bar along the bottom summarises the visible window.
- Tap Close to return to the home screen.
What the statistics mean
| Stat | Meaning |
|---|---|
| Low | Lowest reading in the window. |
| Avg | Average of every reading in the window. |
| High | Highest reading in the window. |
| In-Range % | Share of readings that sat between your low and high warning thresholds. |
| GMI | Glucose Management Indicator — an estimate of what a lab A1C would look like based on the average glucose in this window. |
| CV | Coefficient of variation, a measure of how bumpy the line is. The device flags it once it goes above 36%, the commonly used threshold for “unstable”. |
Settings Menu #
Tap the gear icon on the home screen. Everything configurable lives behind one of these four rows or the two icons in the title bar.
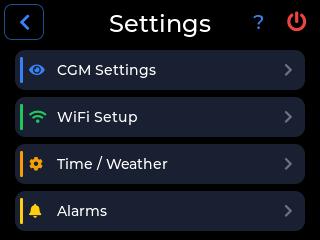
- CGM Settings — choose your data source and sign in. Details.
- WiFi Setup — scan, join, and manage saved networks. Details.
- Time / Weather — location, timezone, and how often weather refreshes. Details.
- Alarms — the four glucose alarm tiers and, behind the gear in that screen’s title bar, the alert options.
- ? in the title bar opens About: firmware version, Check for Updates, the SD logging checkbox, and erase device.
- The red power icon powers the device off. You hold a confirm button to complete it, so a stray tap can’t shut you down.
CGM Setup #
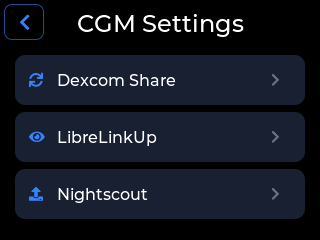
The device doesn’t read your sensor directly — it reads the sharing service your sensor already publishes to. Pick the one that matches your setup. Each has something to arrange on the phone side first.
Dexcom Share
The device signs in as a follower on your Dexcom Share account and reads the same stream your followers see.
Before you start, on your phone
- Share must be turned on in the Dexcom app.
- There must be at least one follower on the account. Share stops publishing entirely when the follower list is empty — if you have none, invite yourself or a family member.
On the device
- gear → CGM Settings → Dexcom Share.
- Tap the Username field and type the username you use to sign in to the Dexcom app.
- Tap the Password field and enter your password. The eye icon reveals what you typed if a character went astray.
- Submit. A progress indicator runs while the device authenticates, then a success banner appears and readings start arriving.
LibreLinkUp
The device connects through LibreLinkUp, the follower app for FreeStyle Libre sensors. You need a working LibreLinkUp account that already shows readings before you type anything into the device.
First: set up LibreLinkUp on your phone
What you need
- A FreeStyle Libre sensor (Libre 14-day, Libre 2, Libre 3, or Libre 3 Plus).
- The FreeStyle Libre app on the sensor wearer’s phone.
- The LibreLinkUp app installed on a phone — yours or the wearer’s.
Step A — the sensor wearer sends an invitation
On the phone paired with the sensor:
- Open the FreeStyle Libre app.
- Open the menu (top-left) and go to Connected Apps (labelled Share in some versions).
- Under LibreLinkUp, tap Manage or Connect.
- Tap Add Connection.
- Enter the name and email address of the person who will sign in on the device.
- Tap Add. An invitation email goes out.
Step B — accept it and create the account
- Open the LibreLinkUp invitation in your email.
- Install LibreLinkUp from the link if you don’t have it.
- Open the app, tap Get Started, and accept the licence agreement.
- Create your account — country, name, email, password.
- Verify the account from the confirmation email.
- Sign in and accept the sharing invitation.
Once you can see live readings in the LibreLinkUp app, the account is ready. Use that same email and password on the device.
On the device
- gear → CGM Settings → LibreLinkUp.
- Enter the email and password of your LibreLinkUp account.
- Submit. On success a banner confirms it and readings begin flowing.
Nightscout
If you run your own Nightscout site, the device reads from it directly. This is the option that works with the widest range of sensors and uploaders, because Nightscout has already done the normalising.
Before you start
- Your Nightscout site must be reachable over the internet and currently receiving data.
- Have the site URL ready, including https://.
- Have an API token (or your API secret) ready. A read-only token is enough — the device never writes.
On the device
- gear → CGM Settings → Nightscout.
- Enter the site URL.
- Enter the API token or secret.
- Submit. On success readings begin flowing.
WiFi #
The device needs WiFi for glucose data, weather, time sync, and updates. There is no cellular fallback — if the network is down, readings stop until it comes back.
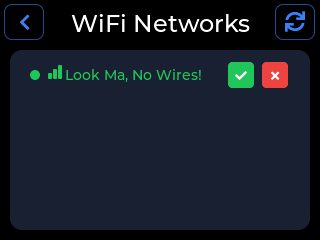
- Open gear → WiFi Setup. The device scans automatically as soon as the screen opens.
- Tap the refresh icon in the title bar to scan again if your network hasn’t appeared yet.
- Tap a network name, then type the password on the on-screen keyboard. The keyboard supports shift (one character) and caps lock (tap shift twice); the eye icon reveals the password.
- Connect. A progress overlay reports what’s happening, and the network gets a green dot once it’s saved.
- To forget a saved network, tap the red × next to it.
Time & Weather #
One setting drives most of this screen: your location. Set it and the timezone, forecast, and sunrise/sunset all follow.
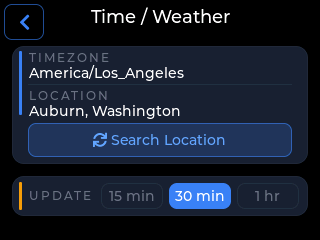
- Open gear → Time / Weather.
- Tap Search Location and type a city name or postal code. Results narrow as you type; confirm the one you want.
- The timezone is derived from that location automatically, and the clock syncs over the network. You don’t pick it separately.
- Choose a weather update interval — 15 min, 30 min, or 1 hr. Longer intervals mean fewer network wake-ups, which matters on battery.
Clock format, date format, and glucose units
The device supports both 12-hour and 24-hour clocks, alternate date formats, and both mg/dL and mmol/L for glucose. These follow your regional settings rather than needing to be picked one at a time — set the region correctly and the whole interface, including the alarm thresholds and the chart, speaks in your units.
Display & Night Dim #
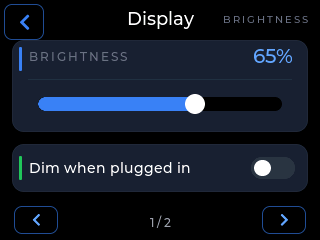
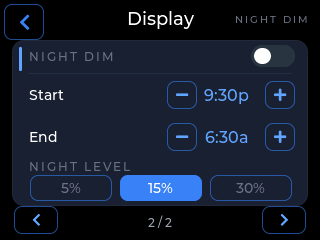
Tap the bulb icon on the home screen. A two-page sheet slides up: brightness on page one, the night schedule on page two. It closes itself after about 30 seconds if you walk away.
Brightness & charging behaviour
- Drag the brightness slider. The screen responds immediately, so you can set it by eye in the room you’re actually in.
- “Dim when plugged in” is off by default — meaning that on USB power the screen simply stays on. That’s the intended way to run the device: plugged in, always readable, no waking it up to check a number.
- Turn that toggle on if you want the screen to dim on charge too — useful in a bedroom where the device is plugged in overnight.
Night Dim and the night face
- Turn on Night Dim and set a start and end time.
- Pick a night level: 5%, 15%, or 30%.
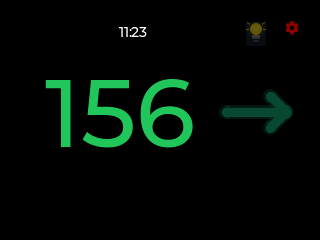
- Inside that window the screen drops to the level you chose and hands the whole display to one huge glucose number, colored by zone — green in range, amber near a warning, red at an alarm — with the trend arrow beside it.
- The time moves to a small white readout in the top bar. That’s deliberate: at a sleepy 3am glance, a big clock and a big glucose value look alike. At night only one number is big, and it’s always the one that matters.
- The dimmed bulb icon stays in the top corner all night, so the display settings are always one tap away.
- Outside the window everything returns to the layout and brightness you had before.
Dimming and waking
- On battery, the screen dims on its own after roughly two minutes of no touches.
- Double-tap anywhere to wake it. The first tap only wakes the screen — it never activates whatever button happened to be under your finger, so you can’t snooze an alarm or open a menu by accident.
- The BOOT button on the board also wakes the device, which is handy in the dark.
Alarms #
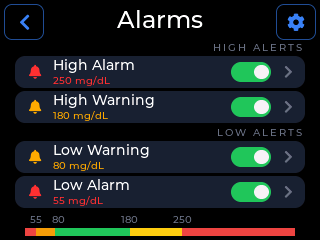
Four tiers, each configured independently: High Alarm, High Warning, Low Warning, and Low Alarm. Warnings are the early nudge; alarms are the ones that mean now.
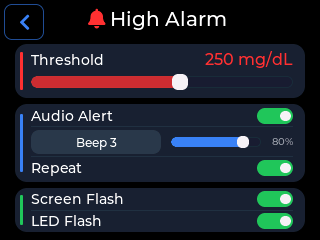
Configuring a tier
- Open gear → Alarms and tap the tier you want to change.
- Drag the threshold slider to the value that should trigger it.
- Audio Alert turns sound on, and exposes the tone and a volume slider.
- Repeat keeps the tone looping until you deal with it, instead of playing once.
- Screen Flash flashes the display, and LED Flash flashes the on-board LED. Either works on its own if you need a silent alert.
- Back on the Alarms list, the range bar across the bottom shows all four thresholds together — a fast way to catch an overlap or a gap you didn’t intend.
Choosing a tone
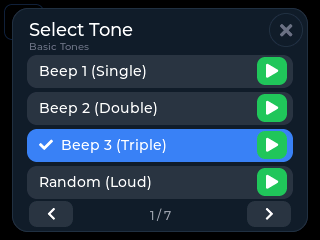
- 28 tones spread across seven pages, grouped from gentle chimes through to genuinely alarming sirens.
- Tap the green play button to preview any tone without selecting it.
- Random (Loud) is the interesting one: instead of a fixed melody it plays a fresh, unpredictable loud sequence every time. Familiar alarms fade into the background after a few weeks — this one can’t, because you have never heard it before.
When an alarm fires
The device takes over the whole screen: the glucose value at full size, a plain statement of why it fired, and two buttons.
- SNOOZE silences it for your configured snooze length. If glucose is still out of range when that expires, it fires again.
- DISMISS is a hold, not a tap — deliberately harder, so a half-asleep swipe can’t clear a genuine low.
- The BOOT button snoozes without needing to find the right part of the screen. Useful in the dark.
- Nobody home? If the alarm goes completely untouched for 30 minutes, it stands down on its own — tone included — and the display returns to the home screen. It counts as a snooze, never a dismiss: if the reading is still out of range when the snooze window ends, the alarm fires again. You can turn this off on the Unattended page of Alert Options; the control takes a three-second hold, so it can never flip by accident. (v0.15.2+)
Alert Options #
Tap the gear icon in the Alarms title bar for six pages of behaviour settings that apply across all four tiers. This is where alarms stop being a threshold and start being a system you can live with.
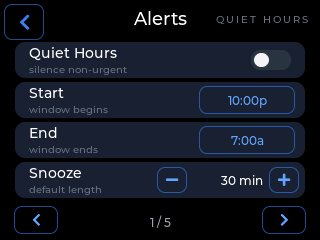
Quiet Hours & snooze
- Quiet Hours defines a window in which non-urgent alerts go visual-only — screen and LED still tell you, the buzzer stays silent. Set a start and an end.
- Snooze default sets how long the SNOOZE button buys you when an alarm fires.
Escalating volume
An alarm that is ignored gets louder over time instead of droning at one level. Starts polite, ends impossible to sleep through.
Data-gap alert
Warns you when readings stop arriving — the silent failure that a threshold alarm can never catch, because a device with no data has nothing to compare against a threshold. When it fires it also names the likely cause, so you know whether to look at the WiFi, the sensor, or the sharing service.
Predictive low warning
Projects the current rate of change forward and warns you roughly 20 minutes before you would otherwise cross your low threshold. Twenty minutes is usually the difference between eating something and needing help.
Rate-of-change alert
Fires on how fast glucose is moving rather than where it currently sits. A steep fall from a perfectly normal number is worth knowing about before it becomes a low.
Urgent-low safety floor
Unattended auto-snooze (v0.15.3+)
The last page controls what happens when an alarm rings into an empty room. With auto-snooze ON (the default), an alarm nobody touches for 30 minutes snoozes itself — screen and tone both — and re-fires if glucose is still out of range when the snooze ends. With it OFF, an unattended alarm keeps sounding until someone responds.
- Changing it takes a three-second hold on the ON/OFF control, with a progress fill so you can see the hold registering. A tap does nothing — deliberately. This is a safety behavior, not a preference to toggle in passing.
- Which setting is safer depends on your household: auto-snooze keeps a bedside device from flashing and buzzing all night at nobody, while OFF is the right choice if a ringing alarm should summon someone from another room.
Updates #
The device updates itself over WiFi. No cable, no computer, and your settings survive the process.
- The device checks for updates automatically once a day in the background. If one is waiting, it tells you.
- To check by hand: gear → ? (About) → Check for Updates. The check runs in the background with a progress overlay, so the screen stays usable.
- If an update is available you’ll see the new version and an install option.
- The device downloads and installs over WiFi, then reboots into the new firmware.
- Your settings are preserved — WiFi, CGM login, alarms, location, display preferences. An update replaces the firmware, not your configuration.
- After the reboot, the home screen shows a one-time “What’s New” card with the new version number and a short list of what changed. Tap OK and it’s gone; it never interrupts an alarm or the night face. (v0.16.0+)
Battery & Power #
The battery is optional. Plenty of people run the device permanently plugged in on a desk or a mantle — that is the intended setup, and the screen stays on for it.
- With an optional LiPo battery fitted, the top of the glucose card shows a battery icon and percentage. Tap the battery to show or hide the percentage; the choice is remembered.
- While charging, the battery icon animates so you can tell at a glance that the cable is actually delivering power.
- At 10% the device beeps to warn you.
- If it keeps draining, the device shuts itself down rather than running the cell flat — deep discharge is what kills a LiPo permanently.
- On USB power the screen stays on by default. Change that under Display if you’d rather it dimmed while charging.
- To power off deliberately: gear → red power icon, then hold the confirm button.
SD Card Logging #
Optional, and off unless you ask for it. With a microSD card in the slot, the device can keep its own copy of every reading it receives.
- Insert a microSD card and restart the device so it is detected.
- Open gear → ? (About). The “Save CGM data to SD” checkbox appears there once a card is present.
- Tick it. From then on every reading is appended to a CSV file on the card.
- Pull the card and open the CSV in any spreadsheet program — it’s plain text, no special software involved.
Tips & Tricks #
The things that aren’t obvious from the screens themselves — mostly learned by living with the device rather than by designing it.
Double-tap to wake
Two taps anywhere on a dimmed screen. The first tap only wakes it, so you can tap confidently in the dark without hitting something.
Swipe for the big number
Swipe left on the glucose card for the across-the-room view. Swipe right to come back. This is the setting most people leave it on overnight.
Tap chart points
Every point on the chart is tappable. Instead of guessing at the line, tap it and read the exact value and time.
Use Random (Loud)
The one alarm tone your brain can’t tune out, because the sequence is different every time. Worth it for the alarms that genuinely matter.
Set Quiet Hours for the night
Warnings go visual-only overnight while the urgent-low safety floor still sounds at full volume. Fewer wake-ups, no loss of the one that counts.
Night Dim for bedrooms
Schedule it, pick 5%, and the screen becomes one dim zone-colored glucose number that doesn’t light the room — with the time small up top where it can’t be misread.
Read the countdown arc
The arc around the trend arrow tells you when the next reading lands. Empty means it’s due; blue means it’s fetching right now. No need to keep refreshing anything.
Leave it plugged in
On USB power the screen stays on by default. That’s the whole point of a dedicated display — glance, don’t unlock.
BOOT button = snooze
When an alarm fires you can snooze with the physical button, without finding the right spot on the screen. Handy at 3am.
mmol/L is supported
Glucose units follow your regional settings. Set the region and the number, the thresholds, and the chart all switch together.
Location search works offline
There’s a built-in fallback list, so you can set a location before the network is sorted out.
Log to SD for history
Drop in a microSD card and tick the box in About. You get a plain CSV of every reading, readable in any spreadsheet.
Troubleshooting #
Find the symptom, read the likely cause, apply the fix. Work down each list — they’re ordered by how often each cause turns out to be the real one.
Screen stays black
Fix: double-tap the screen. On battery the display dims after about two minutes of inactivity, and one tap is deliberately ignored so you can’t press something by accident. If Night Dim is scheduled, you may also simply be inside that window.
Cause — no powerFix: plug into USB with a cable you know carries data and power, not a charge-only cable. If a battery is fitted and fully drained, give it several minutes on the charger before expecting anything on screen.
Cause — the device powered itself offFix: press the BOOT button on the board to wake it. The device shuts down on its own when the battery gets critically low, which is protection, not a fault.
Cause — brightness set to zeroFix: if you can see faint content at an angle, the backlight is just very low. Tap the bulb icon and raise the brightness slider.
WiFi is connected but no readings arrive
WiFi being up only proves the device can reach the internet. The break is almost always between your sharing service and the device’s login. Check the cause that matches your provider.
Dexcom Share — Share is off, or there are no followersFix: open the Dexcom app and confirm Share is enabled and that at least one follower exists. With an empty follower list, Share publishes nothing at all and the device has nothing to read. Adding any follower restores the stream.
LibreLinkUp — sharing was never set up, or the region doesn’t matchFix: open the LibreLinkUp app on your phone. If it doesn’t show live readings, the device can’t either — fix it there first by completing the invitation flow in CGM Setup. Also confirm your LibreLinkUp account is in the same region as the sensor wearer’s.
Nightscout — wrong URL or tokenFix: re-enter the site URL exactly, including https:// and with no trailing slash, and re-enter the API token or secret. Confirm the site loads in a browser and is currently receiving data from your uploader.
Cause — the sensor itself is in warm-up or has endedFix: nothing to fix on the device. During sensor warm-up or after a session ends, there is no data to share. Readings resume on their own.
Cause — password changedFix: if you changed your provider password, re-enter it under gear → CGM Settings. The device is signing in with the old one.
Flashing fails, or the computer doesn’t see the device
Fix: use a cable you know carries data. This is by far the most common cause, and the symptom — the device powers on but never appears — looks exactly like a broken board.
Cause — missing USB-to-serial driverFix: install the USB serial driver for your operating system, then unplug and replug the device. Until the driver is present, no serial port appears for the flasher to select.
Cause — the board isn’t in bootloader modeFix: hold the BOOT button while you plug the cable in (or while starting the flash), then release. Some boards need this every time.
Cause — another program holds the serial portFix: close any serial monitor, terminal, or IDE that might have the port open, then retry. Only one program can hold a serial port at a time.
Cause — unsupported browserFix: browser flashing needs a Chromium-based desktop browser with Web Serial. It does not work on phones or tablets. Full instructions live on the Build page.
An alarm didn’t make any sound
Fix: open gear → Alarms, tap that tier, and check that Audio Alert is on and the volume slider isn’t near the bottom. Volume is per tier, so a quiet warning does not mean a quiet alarm.
Cause — Quiet Hours is activeFix: that is Quiet Hours doing its job — non-urgent alerts go visual-only inside the window. Adjust the window under Alert Options if it’s catching more than you intended.
Cause — the alarm is snoozedFix: a snoozed alarm stays silent until the snooze expires, then re-fires if glucose is still out of range. Shorten the default snooze length in Alert Options if it’s too generous.
Cause — the tier is switched off, or the threshold was never crossedFix: confirm the tier’s toggle is on and look at the range bar at the bottom of the Alarms screen. A threshold set further out than you remember is a common surprise.
Cause — a quiet tone choiceFix: preview tones with the play button and pick something with more presence. For the alarms that matter, Random (Loud) is the one designed not to be tuned out.
Note: an urgent low at 55 mg/dL sounds at full volume regardless of every setting above. If that was silent, treat it as a hardware fault and get in touch.
Touch isn’t responding
Fix: double-tap. A single tap on a dimmed screen wakes nothing on purpose, so it can look like touch is dead when the device is working perfectly.
Cause — the touch controller has stopped respondingFix: wait a few seconds. The device watches its own touch controller and reboots itself within seconds if it stops answering. You’ll see it restart and come back on its own.
Cause — it keeps rebootingFix: repeated reboots usually mean a loose touch ribbon connector rather than software. Power down, reseat the ribbon at the display connector, and power back up.
Cause — a screen protector or wet fingersFix: the panel is capacitive. A thick film over it, or moisture on the glass, degrades touch. Wipe the screen dry and try again.
The time or weather is wrong
Fix: gear → Time / Weather → Search Location. Timezone and weather both derive from the location, so a wrong city gives you both a wrong clock and a wrong forecast. Watch for same-named towns in other states and confirm the right match.
Cause — the clock hasn’t synced yetFix: the device sets its clock over the network shortly after connecting. Confirm WiFi is up and give it a minute after a reboot.
Cause — a daylight-saving change just happenedFix: re-confirm your location so the timezone rules are re-applied, then let the clock re-sync.
Cause — weather looks staleFix: check your weather update interval. On a 1 hr interval the reading on screen can legitimately be nearly an hour old. Drop it to 15 min if you want it fresher.
Cause — the offline fallback was usedFix: if you set your location while offline, the built-in fallback may have picked a nearby entry rather than an exact one. Search again once you’re online for a precise match.
FAQ #
Is this a medical device?
No. CYGM is an open-source hobby project that displays data your existing CGM system has already produced. It is not a medical device, it is not FDA-cleared and not clinically validated, and it must never be the sole basis for a treatment decision.
Always confirm on your official receiver or app before acting — before dosing insulin, before treating a low, before making any call that matters. Readings here can be delayed, stale, or missing entirely if a network, a sharing service, or the sensor itself has a problem, and the device cannot always tell you which.
It was built by a father to keep an eye on his daughter’s numbers from across a room. That is exactly what it is good for, and it is not a substitute for the equipment your care team prescribed.
Does my glucose data pass through your servers?
No. The device talks directly to your provider’s API — Dexcom Share, LibreLinkUp, or your own Nightscout site. Your readings never travel through anything of ours.
There is no CYGM account. Nothing to sign up for, no profile, no cloud copy of your data. The credentials you type stay in the device’s own storage and are used only to sign in to the service you chose. If you give the device away, run erase device from the About screen first to clear them.
The device does reach out for two other things: the weather for the location you set, and a once-a-day check for a firmware update. Neither carries your glucose data.
How long does the battery last?
It depends almost entirely on brightness and how often the screen is awake, so there is no single honest number to quote. A device left at full brightness with the screen permanently on drains quickly; one that dims after two minutes and uses Night Dim overnight lasts substantially longer.
The battery is optional and mainly there for portability. The intended setup is plugged in — on USB power the screen stays on by default, which is the whole point of a dedicated display. Use Display to trade brightness for runtime if you do run it on battery.
Can I run more than one device on the same account?
Yes. Each device signs in independently, so you can put one in the kitchen and one in a bedroom, both following the same CGM account. Set each one up with the same CGM Setup steps.
Alarms, thresholds, brightness, and Night Dim are stored per device, so the bedroom unit can be quiet and dim while the kitchen unit is loud and bright. That’s usually what you want.
How often does the firmware get updated?
Irregularly, and by one person. Updates land when a fix or a feature is actually ready rather than on a schedule. The device checks once a day on its own, so you don’t need to watch for them.
Updates install over WiFi and preserve your settings — see Updates. Release notes for each version are published on the site.