CYGM does one thing exceptionally well — puts your glucose data right where you can see it.
Live Glucose Readings
Real-time data from your Dexcom or FreeStyle Libre CGM, refreshed every 90 seconds. Always current, always visible.
Trend Charts
Interactive glucose graphs with 1, 3, 6, 12, and 24-hour ranges. Color-coded segments show highs, lows, and in-range.
Smart Alarms
Configurable high and low glucose alerts with adjustable thresholds, snooze durations, and custom alarm tones.
Weather & Time
Local weather conditions, temperature, date, and clock. A useful bedside companion beyond just glucose.
OTA Firmware Updates
Update wirelessly over WiFi — no cable or computer needed after initial setup. Always running the latest version.
Touchscreen Interface
Full capacitive touch UI for navigating settings, charts, alarms, and more — right from the 2.8" display.
Gallery
See it in action
Use Cases
A display for every context
Whether it's your nightstand or a nursing station, CYGM fits right in.
Bedside Monitor
Place it on your nightstand. See glucose readings at a glance without reaching for your phone. Night-time alarms wake you when levels are off.
School Nurse's Office
Give school staff visibility into a student's glucose without needing their phone. A simple, dedicated display that anyone can read.
Clinic or Care Facility
Affordable enough to place at every nursing station. Monitor residents with CGMs from a small, always-on display right at the desk.
Our Story
Built because waiting wasn't an option
CYGM was born out of a simple need: a dedicated glucose display that doesn't depend on a phone. Something you can place on a nightstand, a desk, or a nursing station — and just glance at.
Commercial options are expensive, proprietary, and often require subscriptions. CYGM is the opposite: open-source, ~$40 in parts, and built by the community that needs it most.
This project is part of the #WeAreNotWaiting movement — a global community of people with diabetes and their families who build their own tools because the market moves too slowly.
#WeAreNotWaiting
Build Your Own
Ready to build in minutes
Everything you need is available off the shelf. Order the parts, set up the firmware, and you're done — no soldering, no coding, no complicated setup.
📟
ESP32 Display Board
2.8" touchscreen development board with WiFi, USB-C, and microSD slot. The heart of CYGM.
🔊
Mini Speaker
1W 8Ω full-range speaker with JST-PH 1.25mm connector. Plugs right in for alarm sounds.
🔋
3000mAh Battery
Rechargeable LiPo battery for portable use. Our 3D-printed case is designed to fit this exact size.
Flashing firmware requires a desktop or laptop computer. Visit this page on your computer to flash your device.
Google Chrome or Microsoft Edge USB data cable (not charge-only) Device connected via USB
Flash CYGM firmware directly from your browser. Requires Google Chrome or Edge, a USB data cable (not charge-only), and your device plugged in via USB.
v0.5.0Beta
Enter Boot Mode First
Press and hold both BOOT and RESET buttons at the same time
Release RESET while continuing to hold BOOT
Click “Install Firmware” below and select your COM port
Keep holding BOOT until the progress reaches ~5%, then release
Wait for the flash to complete (~60 seconds)
If you don't see a COM port, install the CH340 driver linked below.
Flashing will erase all saved settings (WiFi credentials, alarms, preferences). You will need to re-enter them after flashing.
Flash complete! Unplug USB and power on your device — it will boot into the setup wizard.
An error occurred. Check your USB cable, enter boot mode, and try again.
Your browser doesn't support Web Serial.
Use Google Chrome or Microsoft Edge on desktop to flash directly from the browser, or download the firmware and flash manually:
Sound engineer, lighting tech, and stage manager in the live entertainment industry by trade — hobbyist developer by passion. When my step-daughter was diagnosed with Type 1 Diabetes, I knew I had to do something. With the incredible support of my wife Stefanie, CYGM was born: an affordable, open-source tool to make life a little easier for the families who need it most.
Based in Auburn, WA. Driven by a simple belief: if I can help make someone's life easier, I should.
Medical Disclaimer — CYGM is an open-source hobby project and is not a medical device. It is not FDA-approved, not clinically validated, and should never be used to make medical decisions. Always consult your healthcare provider and rely on your primary CGM receiver or app for treatment decisions. CYGM is provided as-is, with no warranty. Use at your own risk. The developers are not responsible for any adverse outcomes resulting from use of this device or software.
Getting Started
Your step-by-step setup guide
Getting Started
Welcome to CYGM
Your new continuous glucose monitor display is ready to set up. This guide will walk you through everything — from connecting to WiFi to customizing alarms. It only takes a few minutes.
First boot? If you scanned the QR code on your device's screen, you're in the right place. Follow the 3 steps above to get your device showing glucose data in minutes.
Step 1 of 3
Connect to WiFi
CYGM needs WiFi to fetch glucose data and weather updates. This is the first thing to do after powering on your device.
Connecting to WiFi
1Tap the WiFi icon on the home screen, or go to Settings → WiFi Setup
2Available networks will scan automatically. Tap Refresh (top-right) to re-scan.
3Tap your network name. Enter your WiFi password using the on-screen keyboard.
4Tap Connect. A progress overlay shows connection status.
5Once connected, you'll see your IP address and a green checkmark.
Managing Saved Networks
Previously connected networks appear with a green dot. Tap the × button next to any saved network to forget it.
Tip: Tap the eye icon in the password field to toggle password visibility. The keyboard supports shift (tap once for next character) and caps lock (tap twice).
If WiFi disconnects during use, an orange overlay will appear. CYGM automatically reconnects in the background — no action needed.
Step 2 of 3
CGM Login
Link your CGM account to start receiving glucose data. Your credentials are stored locally on the device — never sent anywhere except your CGM provider's servers.
Dexcom Share
1Go to Settings → CGM Settings
2Tap the Username field. The on-screen keyboard will appear.
3Type your Dexcom Share username (the one you use in the Dexcom app).
4Tap the Password field and enter your password. Tap the eye icon to verify what you typed.
5Tap Submit Login. You'll see a progress indicator while CYGM authenticates.
6On success, a green "Login Successful" banner appears and glucose data begins flowing automatically.
Important: You need Dexcom Share enabled in your Dexcom app (Settings → Share → Invite Follower). CYGM acts as a follower to receive your data.
FreeStyle Libre (LibreLinkUp)
Before you start: CYGM connects through LibreLinkUp, Abbott's follower app. You must have a LibreLinkUp account set up before entering your credentials on the device. If you don't have one yet, expand the setup guide below.
What you need
CYGM reads glucose data through LibreLinkUp — Abbott's companion app that lets caregivers and family members follow a sensor wearer's readings remotely. You'll need:
•The FreeStyle Libre app (or compatible app) on the sensor wearer's phone
•The LibreLinkUp app installed on a phone (yours or the wearer's)
Step A — Sensor wearer sends an invitation
On the phone that's paired with the Libre sensor:
1Open the FreeStyle Libre app
2Tap the ☰ menu (top-left) → Connected Apps (or Share)
3Under LibreLinkUp, tap Manage or Connect
4Tap Add Connection
5Enter the name and email address of the person who will log into CYGM
6Tap Add — an invitation email is sent
Step B — Accept the invitation & create a LibreLinkUp account
1Check your email for the LibreLinkUp invitation
2Tap the link to download LibreLinkUp (iOS or Android) if you don't have it
3Open the app, tap Get Started, and accept the license agreement
4Create your account — choose your country, enter your name, email, and a password
5Check your email again to verify your account
6Log into the app and accept the sharing invitation
Once you see glucose readings in the LibreLinkUp app, your account is ready. Use the same email and password to sign into CYGM below.
Monitoring yourself? You can invite yourself — just use your own email address in Step A. You'll get a LibreLinkUp account that follows your own sensor.
On your CYGM device
1Go to Settings → CGM Settings
2Tap LibreLinkUp
3Tap Sign In, then enter the email and password from your LibreLinkUp account.
4On success, a green "Login Successful" banner appears and glucose data begins flowing automatically.
Region matters: LibreLinkUp accounts are region-locked. Your LibreLinkUp account must be in the same country/region as the sensor wearer's LibreView account, or sharing won't work.
Sensor Changes
If CYGM stops receiving data for an extended period, a "No Data Received" overlay will ask if you're changing your CGM sensor. Tap Yes if you are (this adjusts data validation), or No to continue normally. The overlay auto-dismisses after 30 seconds.
Step 3 of 3
Set Your Location
Set your timezone and location to get accurate local time, weather conditions, and sunrise/sunset times on the home screen.
Setting Your Location
1Go to Settings → Time / Weather
2Tap Location Search
3Type your city name or postal code using the on-screen keyboard
4Results appear automatically as you type. Use Previous / Next to browse matches.
5Tap Confirm to apply the location. Weather data and sunrise/sunset times update immediately.
Other Settings
Timezone
Select your timezone from a dropdown list (e.g., "America/New_York"). Time syncs automatically via SNTP.
24-Hour Format
Tap the toggle switch to switch between 12-hour (2:30 PM) and 24-hour (14:30) clock display. The change applies immediately.
Temperature Unit
Tap the toggle switch to switch between Fahrenheit and Celsius. All temperature displays update instantly.
Weather Update Interval
Choose how often weather data refreshes (e.g., every 15, 30, or 60 minutes). Select your preferred interval from the dropdown.
Tip: Selecting your weather update interval is the final step — it saves your settings and returns you to the home screen automatically.
You're all set! After completing these 3 steps, your CYGM device will show live glucose data, local weather, and time. Scroll down to learn about all the features.
Getting Started
Home Screen Overview
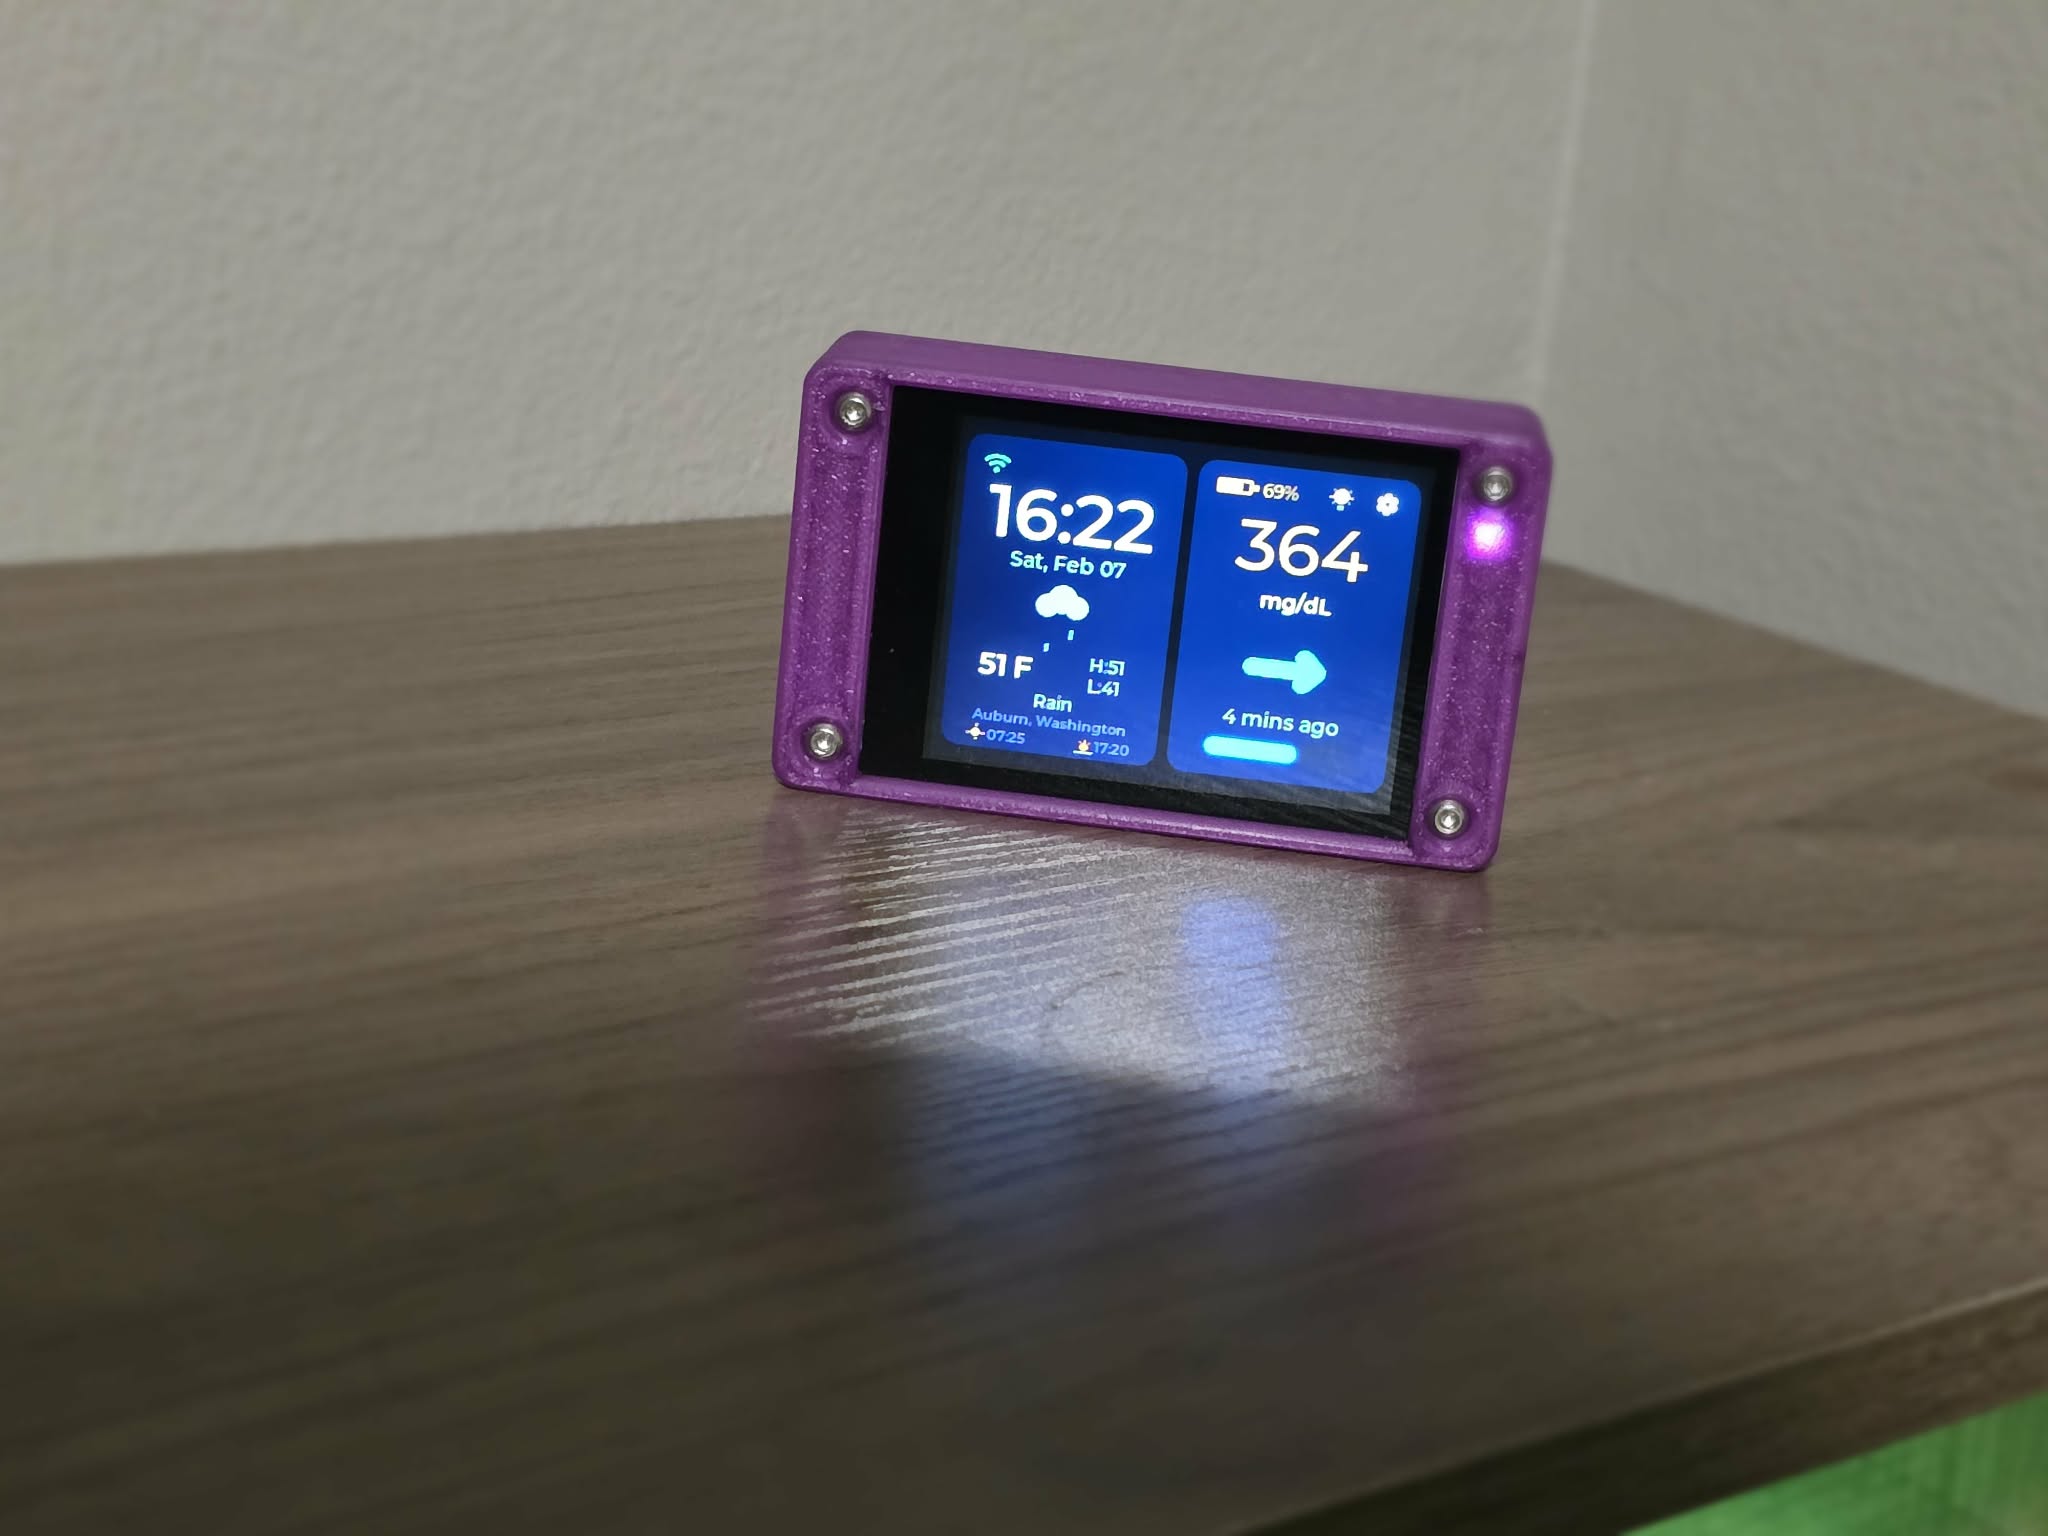
The home screen is your at-a-glance dashboard. It shows your current glucose reading, weather, time, and device status — all on one screen.
What you'll see
The home screen is split into two cards:
Time & Weather Card
Current time (with AM/PM), temperature, weather condition icon, today's high/low, and sunrise/sunset times.
CGM Card
Your current glucose value, trend arrow, time since last reading, battery level, and a progress bar showing time until next data fetch.
Status Indicators
WiFi Icon (green)
Connected to WiFi. Tap to open WiFi settings.
WiFi Icon (gray + red)
Disconnected. Auto-reconnect is in progress.
Brightness Icon
Tap the lightbulb to open the brightness slider.
Settings Gear
Tap to open the main settings menu.
Navigation
Gestures & Touch
CYGM uses simple swipe and tap gestures. There are no complicated menus to memorize.
Swipe Left
Expand the CGM card to full screen. The time/weather card slides away, and your glucose value gets much larger — perfect for reading across the room.
Swipe Right
Collapse back to the normal two-card layout. Restores the time & weather card alongside the CGM card.
Tap Battery Icon
Toggles the battery percentage display on or off. Your preference is saved automatically.
Tap WiFi Icon
Opens WiFi settings so you can connect to a new network or check your connection status.
Tap the Time
Toggles between 12-hour and 24-hour clock format. Your preference is saved automatically.
Tap the Temperature
Switches between Fahrenheit and Celsius. The change applies instantly across all displays.
Pro tip: The expanded CGM view is great for nightstand use — the glucose value is large enough to read from several feet away.
Core Feature
CGM Display & Trend Arrows
Your glucose value updates every 90 seconds from your CGM provider. The trend arrow shows which direction your glucose is heading.
Expanded CGM View
Swipe left (or tap the glucose value) to expand to a full-screen view with:
1Extra-large glucose digits (120pt) — readable from across the room
2Large trend arrow (80x80px) showing direction
3Time since last reading ("5 min ago")
4Mini battery, time, and weather info in the top bar
Trend Arrows
The trend arrow tells you how fast your glucose is changing:
⇧⇧Rising rapidly (>3 mg/dL per min)
↗Rising (2-3 mg/dL per min)
↗Rising slightly (1-2 mg/dL per min)
→Stable (<1 mg/dL per min)
↘Falling slightly (1-2 mg/dL per min)
↘Falling (2-3 mg/dL per min)
⇩⇩Falling rapidly (>3 mg/dL per min)
Glucose Colors
The glucose value changes color based on your alarm thresholds — the ranges below adjust automatically when you change your alarm settings:
In Range
Between your low and high warning thresholds
Warning
Between your warning and alarm thresholds
Critical
Beyond your high or low alarm thresholds
Tip: These colors are tied directly to your Alarm settings. Adjust your alarm thresholds and the display colors update to match.
Trends
Glucose History Chart
View your glucose trends over time with an interactive chart. Great for spotting patterns and understanding how your glucose responds throughout the day.
How to open
Tap the trend arrow or the "X min ago" text on the home screen. The chart opens as a full-screen overlay.
Time Ranges
Use the tabs at the top to switch between time windows:
1h3h6h12h24h
The default view is 6 hours. You can also swipe left/right on the chart to change the time range.
Reading the chart
1The green shaded band shows your target range, based on the thresholds you set in Alarms
2The glucose line changes color based on value (green, yellow, red)
3Dashed lines bridge gaps where data was missing (>10 min)
4Tap any point on the line to see the exact value and timestamp
Tap the × button to close the chart and return to the home screen.
Alerts
Alarms & Notifications
Set up audio and visual alarms for high, low, and critical glucose thresholds. Each alarm is independently configurable with its own sound, volume, and behavior.
Alarm Types
Alarm
Default
Purpose
High Alarm
240 mg/dL
Urgent high glucose alert
High Warning
180 mg/dL
Early high glucose notice
Low Warning
80 mg/dL
Early low glucose notice
Low Alarm
55 mg/dL
Urgent low glucose alert
Configuring an Alarm
1Go to Settings → Alarms
2Toggle the alarm ON with the switch
3Drag the threshold slider to set your trigger value (50–500 mg/dL)
4Toggle Audio (buzzer beep) and Visual (flashing border) independently
5Enable Repeat to loop the alarm sound until dismissed
6Tap Tone to choose from 12 built-in sounds. Tap the play button to preview each one. (More sounds coming in future updates!)
Available Alarm Tones
1. Beep (Single)
2. Beep (Double)
3. Beep (Triple)
4. Chime (Gentle)
5. Twinkle Twinkle
6. Für Elise
7. Dixie Horn
8. When the Saints
9. Siren (Urgent)
10. Ascending Scale
11. Doorbell
12. Big Ben
When an Alarm Triggers
A full-screen alarm overlay appears with your current glucose value and quick-snooze options:
5 min10 min15 min30 minDismiss (3 Hours)
Snoozing temporarily silences the alarm. It will re-trigger if your glucose is still in the alarm range when the snooze expires.
Display
Brightness Control
Adjust the screen brightness to match your environment. Lower brightness saves battery and is easier on the eyes at night.
1Tap the brightness icon on the home screen or in the expanded CGM view
2A brightness slider overlay appears, showing the current percentage (0–100%)
3Drag the slider to adjust — brightness changes in real-time as you drag
4Tap OK to save your preference. It persists across reboots.
Tapping outside the overlay closes it without saving. Your brightness will revert to the previously saved value on next power-on.
Hardware
Battery & Power
CYGM runs on a rechargeable LiPo battery. Charge via the USB-C port on the device.
Battery Display
The battery icon and percentage appear in the top-right corner of the CGM card. Tap the battery icon to toggle the percentage on/off. Your preference is saved.
Charging
Plug in a USB cable to charge. You'll see a pulsing green animation on the battery icon while charging.
Powering Off
1Open the Settings menu (tap the gear icon)
2Tap the red power button in the top-right corner
3Hold the "Hold to Power Off" button for 2 full seconds (a red progress bar fills as you hold)
4The device enters deep sleep. Press the BOOT button on the board to wake it up.
The battery may slowly drain while powered off (deep sleep, not full shutdown). If you won't use the device for extended periods, charge it before storing.
Low Battery
When battery drops below 10%, a low-battery warning overlay appears. Plug in to charge as soon as possible to avoid data interruption.
Maintenance
Software Updates (OTA)
CYGM can update its firmware over WiFi — no computer or cables needed. Updates are checked automatically once per day.
Checking for Updates
1Go to Settings → ? (About)
2Tap "Check for Updates"
3If an update is available, you'll see the new version number and an Install button
Installing an Update
1Tap Install. The device will stop background tasks to free memory.
2A progress bar shows download and installation status (~60 seconds)
3The device automatically reboots into the new firmware version
Do not unplug or power off during an OTA update. If the update fails, the device will reboot safely — your previous firmware remains intact. Just try again.
Tip: OTA updates preserve your WiFi credentials and alarm settings — they only replace the firmware, not your saved preferences.
System
About & SD Logging
View device info, firmware version, and toggle glucose data logging to an SD card.
About Screen
Go to Settings → ? (Info button) to see:
Firmware Version
Current version number, build date, and developer info.
Check for Updates
Manual trigger for OTA firmware update check.
SD Card Logging
If an SD card is inserted, toggle "Save CGM data to SD" to log all glucose readings to a CSV file.
SD Card Data Logging
When enabled, every glucose reading is saved as a CSV row with timestamp, value, and trend direction. You can remove the SD card and read the CSV on any computer.
Tip: The SD logging checkbox only appears in the About overlay when an SD card is physically inserted and detected.
If you remove and re-insert the SD card while the device is running, you must press the reset button on the device to reboot. The SD card will not be detected again until after a restart.
First-Launch Disclaimer
On first power-on (or after a factory reset), a medical disclaimer overlay appears. Check "Don't show again" and tap "I Agree" to dismiss permanently.
Shop
Get your CYGM device
Shop
The CYGM Store
Get a pocket-sized CGM display — assembled and ready to go, or as a kit you build yourself. Open-source firmware, no subscriptions, yours forever.
Secure Checkout
US Shipping
Open Source
Product
Complete Device
Assembled, tested, and firmware-flashed. Plug in and go.
CYGM Complete
Everything you need in one box. Hand-assembled with care, fully tested, firmware pre-loaded. Just connect to WiFi and enter your CGM credentials.
What's Included
JC2432W328 Board
1W Speaker
3000mAh Battery
3D-Printed Case
USB-C Cable
4x M3x10 Screws
Black
Select your case color above before pressing Buy. Default is Black. More colors coming soon as the project grows.
$50
+ $4.95 flat rate shipping
Product
DIY Kit
All the electronics — you print the case and assemble it yourself.
CYGM DIY Kit
For makers and tinkerers. All electronic components included — just 3D-print a case (STL files provided) and put it together. Flash firmware via the web flasher on this site.
What's Included
JC2432W328 Board
1W Speaker
Li-Po Battery
USB-C Cable
4x M3x10 Screws
Note: 2mm Allen Key required for assembly (not provided)
$40
+ $4.95 flat rate shipping
Support
Support the Project
CYGM is open-source and built by a family. Donations help fund components, hosting, and development time. Every dollar makes a difference.
Donate to CYGM
Your support keeps this project alive. No amount is too small — it all goes directly toward building and improving CYGM devices for the diabetes community.
$
$25One-time donation
Info
Shipping & FAQ
Shipping
Every CYGM is hand-assembled and tested by our family. Most orders ship within 7 business days, though occasionally we may need a bit longer if we're waiting on components. We'll keep you updated via email with tracking once your device is on its way.
Returns
30-day return policy for unopened items. Defective devices replaced at no cost. Contact us at support@cygm.me for any issues.
Warranty
30-day hardware warranty. Firmware updates are free forever via OTA. Open-source means you can always fix, modify, or improve it yourself.
Support
Setup help via the Device Guide on this site. Community support via GitHub Discussions. Direct email: support@cygm.me.
CYGM currently supports Dexcom (G6, G7, ONE via Dexcom Share) and FreeStyle Libre (Libre 2, Libre 3 via LibreLinkUp). Both are included in the firmware — you choose your provider during setup. Nightscout support is in beta testing, which will allow any CGM to work via the Nightscout API.
No. CYGM is a one-time purchase. Firmware updates are delivered free over-the-air (OTA). The device pulls data directly from your existing CGM provider account — no additional services or fees.
The Complete Device arrives fully assembled with a 3D-printed case and firmware pre-installed — plug in and go. The DIY Kit includes all electronic components; you 3D-print the case yourself (STL files provided) and flash firmware using the web flasher on this site.
Currently US only. International shipping is coming soon — follow us on GitHub for updates.
No. CYGM is a display accessory — it shows data from your existing CGM system. It is not FDA-approved and should not be used to make medical decisions. Always refer to your official CGM receiver or app.